If you’ve ever grown totally bored with some framed art or photos, you’re not alone. Don’t be afraid to completely shake things up by unleashing some unconventional creativity on them to spice up your home decor. Even if it’s just for this Christmas season – it’s cool. When the holidays are over, either tuck it away for next season or change it up with every season to come. Is really easy peezy.
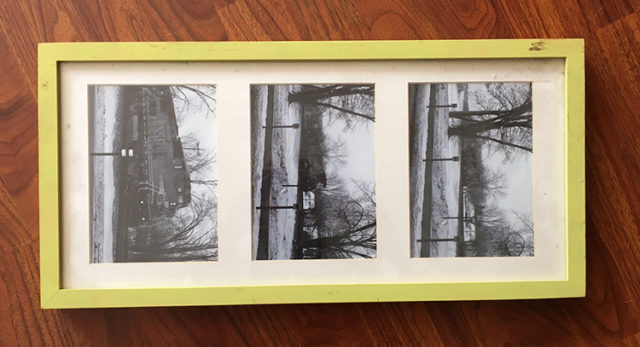
I started with this framed set of train photos, taken by my hubby years ago. Originally, we picked up this frame from Ikea and then slopped on this paint. Why this color? Yeah, I’m not totally sure either. Anyhow… this trio of pics adorned the walls in the man cave at our previous home, and had since spent the past 4 years tucked away in our basement in a tub full of frames. I pulled it out the other day and decided to give it a swift makeover – clearly it was in desperate need.
Supplies you’ll need:
Paper Riot Co. Enchanted Forest Decals (available exclusively at Target)
Three-opening frame (or any frame you choose)
Gold Spray Paint
Scotch Tape
Scissors
Step 1: First, you’ll disassemble the frame.
Most frames are assembled for easy access to the photo area. Simply bend back the little fasteners and remove the back of the frame along with the “guts”. This project contained one large 3-opening mat and a piece of particle board for the backing. I set those, along with the glass, aside for the moment.
Step 2: Next, you’ll clean the frame and glass.
Remove any “goop” from the frame (lightly sanding, if required) and use glass cleaner to clean the glass. Set it aside.
Step 3: Next, you’ll spray paint the frame.
Placing it in a well-ventilated area (preferably outside), spray the frame gold. Allow to dry, then repeat with a second coat. Make sure all areas of frame are well covered.
Step 4: While paint dries, you’ll adhere white paper to backs of photo openings.
For this project, we simply trimmed white, sturdy cardstock and placed it behind the photo openings, using Scotch Tape to secure it in place.
Step 5: Next, you’ll adhere decals.
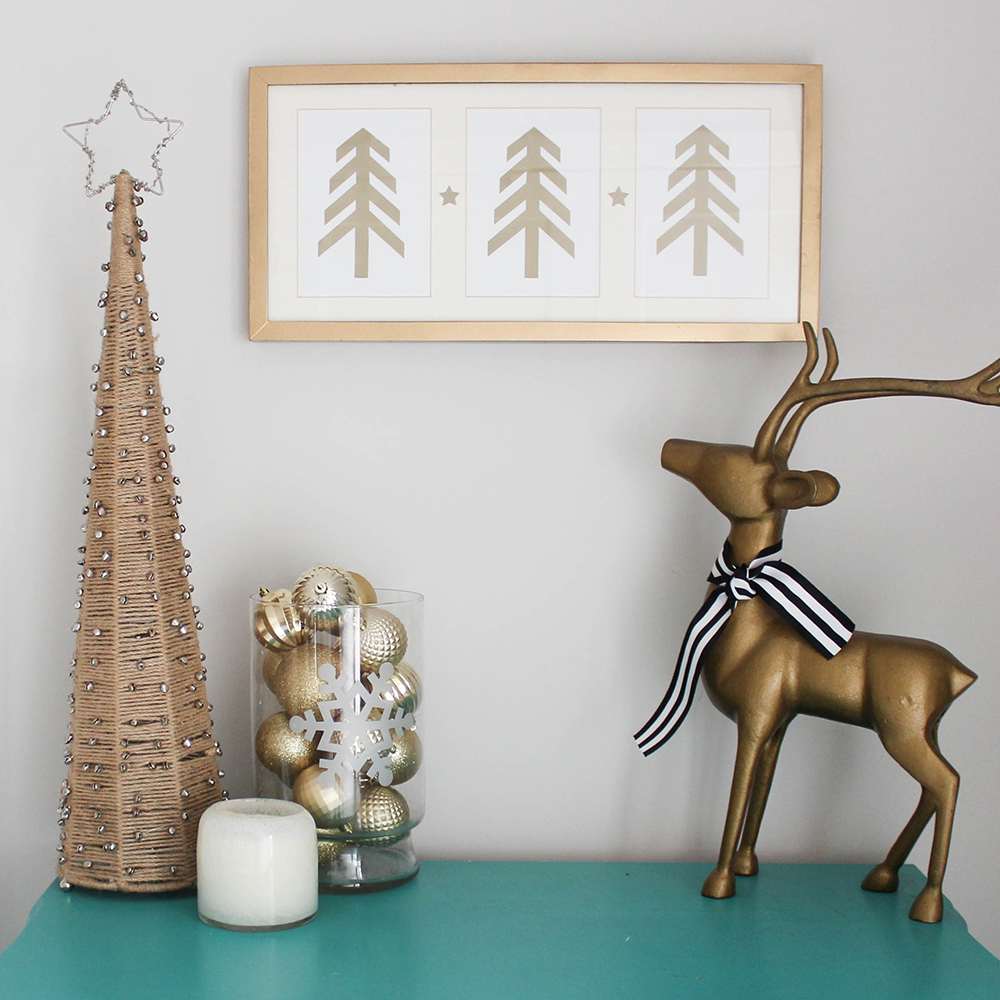
For this project, we placed one gold tree in each of the photo openings, carefully centering each one. We also placed one star between the center tree and the one on either side of it. That’s it – your design is finished. *applause*
Step 6: Next, you’ll assemble the art back into the frame.
After you’re certain the paint has completely dried, carefully load the glass, mat, artwork and backing back into the frame and secure into place with fasteners. Wipe away any errant fingerprints from glass.
Step 7: Lastly, you’ll hang it, then stand back and love.
Yes, you’ll want to stop by frequently after you hang this one and just admire it. It’s a lovely piece.

We’d love to see what framed pieces you come up with using Paper Riot Co. Wall Decals. Share them with us on our Facebook Page or on Instagram. The creative genius in you is waiting to bust out – you know there’s always room for a little riot in every room.
Get Your Riot On – happy holidays!