
Bam. Just like that, the holiday season is upon us. And who doesn’t love to count down the days until Christmas Eve arrives? This upcycled industrial spool top makes the perfect backdrop for this fun DIY Christmas Countdown calendar. And the kiddos will love ticking the days down – one at a time! And it’s way easier to create than one might think.
What you’ll need:
- Paper Riot Co. Merry Christmas Antlers and Dimensional Christmas Countdown Decals
- Scrapbooking Number Stickers (with permanent, heavy-duty adhesive is recommended)
- Wood spool end (we used a 36″ diameter end)
- Paint, paint brush and polycrylic sealer (we used Rustoleum Matte Clear)
- Orbital sander (we used 120 grit to start, and finished with 220 grit)
- 6″ Round metal plate (we found ours at a craft store)
- Drill with metal-capable bit
- Screws
- 12″ clock hand with clock mechanism (we found these at a craft store)
- Scissors
First, you’ll need to locate a wood spool end. That one’s (most often) pretty easy. There are loads of electric companies all over that dispose of these all the time. Here’s a handy link to a few great places to seek out one for yourself. Just reach out and ask if you could have (or buy) one. Heck, grab a pile of them for future projects, too!
Once you’ve located a spool end, you’ll need to sand it down so it’s as smooth as possible. If it needs cleaning, you can use a wire brush before sanding. Start with 120 grit sandpaper, then finish with 220. Be sure you can run your hand over the surface of the spool end and feel a nice, smooth finish.
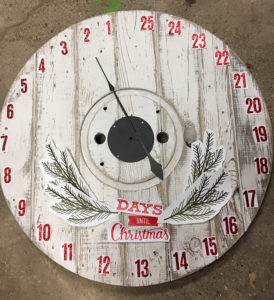 Paint the entire face and sides of the spool end. Once dry, sand the entire surface to distress. Brush away any excess dust, then apply a coat of polycrylic sealer. Allow to dry completely, then cut design pieces from large decal sheets and lay them onto the spool end for placement. NOTE: Due to the separation spaces between each board on the face of the spool, you’ll need to trim decals that overlap those spaces and tuck them slightly into the spaces.
Once all pieces have been placed as you’d like them to be, begin peeling backing off each piece and apply decal. Rub decals onto the spool with your fingers. After all decals have been applied, brush two coats of polycrylic sealer over entire spool face, including over decals.
After both coats of polycrylic sealer have dried, drill four holes along edges into metal plate and one larger hole in center. Insert clock mechanism into largest hole in center, then adhere according to package instructions. (you can skip the battery – we’ll be moving the hand manually each day). Adhere metal plate to spool using wood screws.